
Step 1 — “Weight of the World”
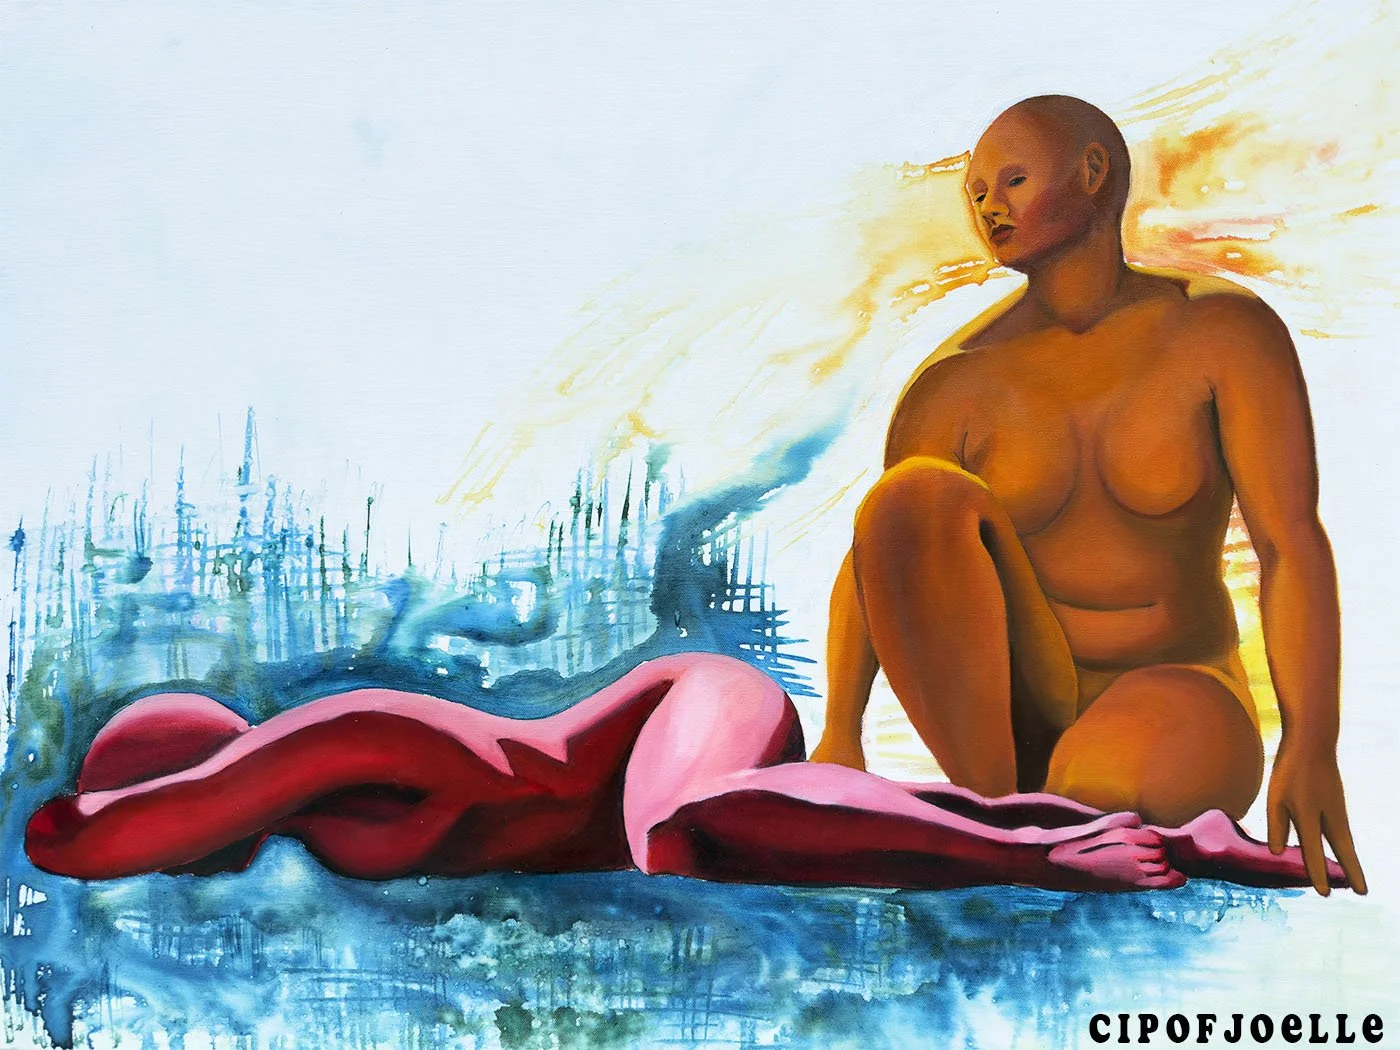
It’s when everything is so heavy and you’ve given up. The red character on the ground is ignoring that there’s help around for them. Behind their arm is their higher self with yellow energy reaching toward them, nudging softly, saying, “Hey, if you look behind you, I’m here.” Around the red body, there is a grid-like texture representing the matrix: the illusion of separation that traps us in our pain.
It’s a reminder that even when we feel completely alone, we’re not. When you feel like no one’s listening, you can scream into the void that you need help, and your higher self/higher power will come through. Energetically, this piece begins in the Root Chakra, the center of survival and stability. When life feels unlivable, this chakra grounds us in the truth that being here, even when it hurts, is the first act of courage.
The yellow and orange hues behind the higher-self flows into the Sacral and Solar Plexus Chakras, symbolizing movement and willpower, the energies that begin to rise once survival is accepted. The higher self appears in these colors to show that even in the darkest moments, your evolution is already underway.
The background’s fiery glow is the first whisper of awakening: you are not alone. Your next color, your next step, is already waiting to meet you.
Step 2 — “It’ll Be OK, I Promise”
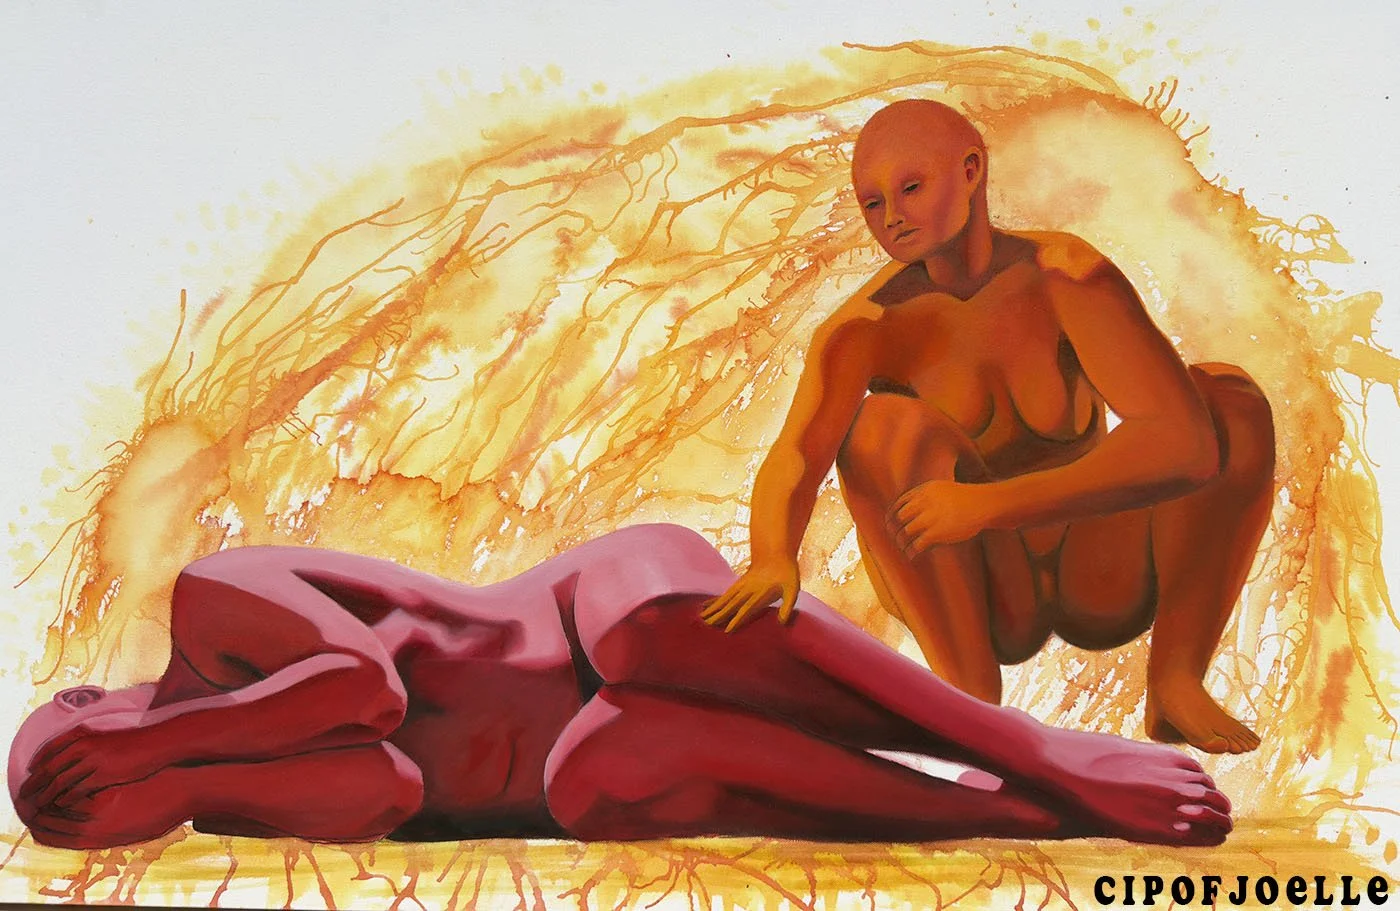
This piece represents the opening of that moment when you begin to look toward something greater than yourself. The red figure still lies in surrender, heavy with exhaustion and disbelief, while the orange-self squats beside them, radiating warmth. It’s that first whisper of faith, a soft promise that help exists if you allow it in.
In the background, the energy swirls between the old pain and a new presence. The darker, almost monstrous streaks near the red body represent the parts of yourself still in resistance. While behind the orange figure, an ethereal face emerges, watching gently, like a higher power saying, “You’ve finally seen me.” You may realize you’re not alone and something beyond logic is holding space for you. The orange being is touching the red being, making their presence known that there is assistance waiting for them in the beyond.
This step rises from the Root to the Sacral Chakra, from red to orange. The red embodies survival; the orange, desire and emotional flow. This is where you begin to trust that flow to let life, Spirit, or whatever name you give it, start to move through you. It’s the higher self’s way of saying: you don’t have to carry this alone anymore, “it’ll be OK, I promise.”
Step 3 — “Fine.”
“I guess I’ll get up.”
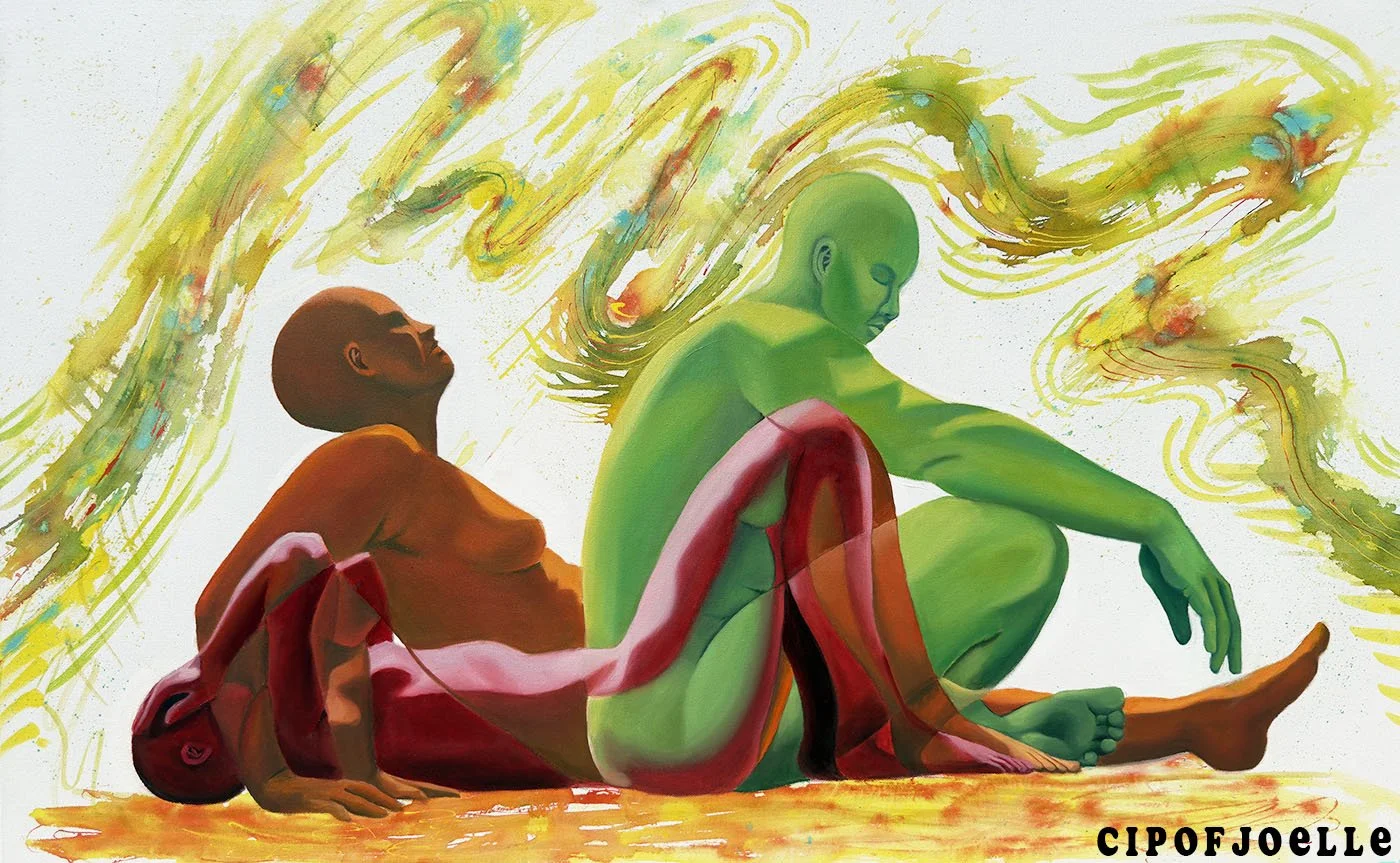
A reluctant rise is the energy of this one. The orange figure sits in stillness, their warmth fading into green, while the red still lingers underneath like a bruise that hasn’t fully healed, “Ugh…” This is the stage where you start doing the work not because you want to, but because you know you have to. There’s no rush of inspiration here, just the quiet resistance of someone who’s tired of their own excuses.
The energy between the two bodies feels uneasy, like an argument between the old self and the one trying to take over. You can almost hear it: “Fine. I’ll stop. But I still want to.” It’s not surrender yet, it’s compliance, the first uncomfortable cooperation between the two versions of the self that’s trying to heal.
This moment also marks a pivotal point of the crossroads. You can go backward, or you can go forward. You’re welcome to sit up or lay back down. That’s the choice the orange figure holds. It’s the moment when accountability meets free will. When the higher self doesn’t pull you, it waits for you to decide.
This step moves from the Root (red, survival) into the Sacral (orange, desire) and begins brushing against the combined being of the Solar Plexus (yellow, will-power) and Heart (green, inner peace and love). It’s where emotion starts to meet accountability, where feeling gives way to action. The orange’s warmth cools into the yellow-green’s steadiness, marking the first act of self-love: trying. You’re not free yet, but the motion has begun. The will to rise is there, even if it sounds like a sigh.
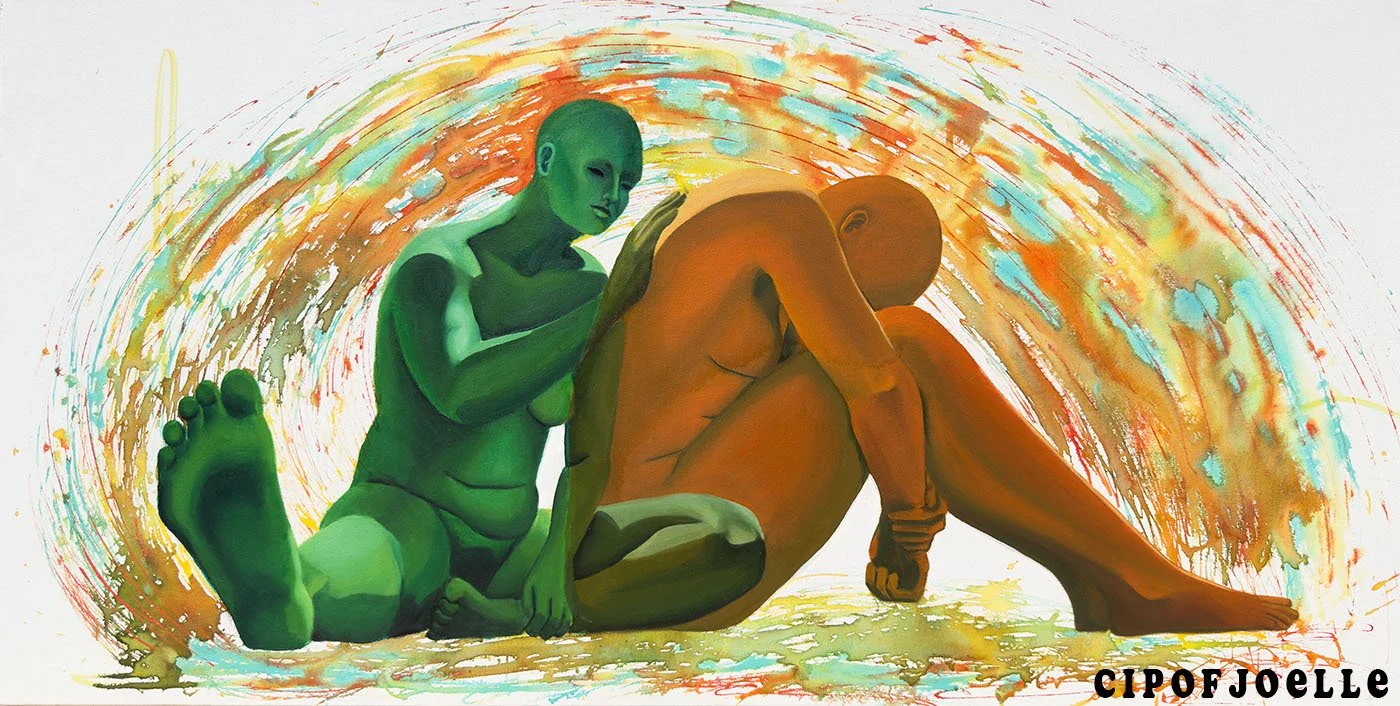
Step 4 — “I’m Here for You”
This is one of the hardest steps in the process where you have to go within and reflect on everything you’ve done in relationships and take accountability. It’s the moral inventory: where you list your liabilities and your assets, the truths and the shadows, the harm caused and the ways you’ve tried to love. It’s deep inner-work and that’s why the orange figure is looking inward, their body turned toward the weight of reflection. The green form sits close behind, a hand resting on their back, quietly reminding them: “I’m here for you.” The higher self doesn’t rush or judge, it holds space while the truth surfaces, while you work through the emotions that come up.
This piece marks the crossing from the lower being moving from the Sacral(orange) into the Solar Plexus (yellow), with the help of the Heart (green). It’s the first breath of forgiveness, not for others yet, but for yourself. It’s where shame meets grace. You begin to see that accountability isn’t self-punishment, it’s self-ownership, and it’s how healing begins to feel real.
This step isn’t about fixing anything yet. It’s about seeing. The green’s presence shows that love can exist even while you confront your worst moments. Self-awareness isn’t the end of the world, it’s the beginning of forgiveness.
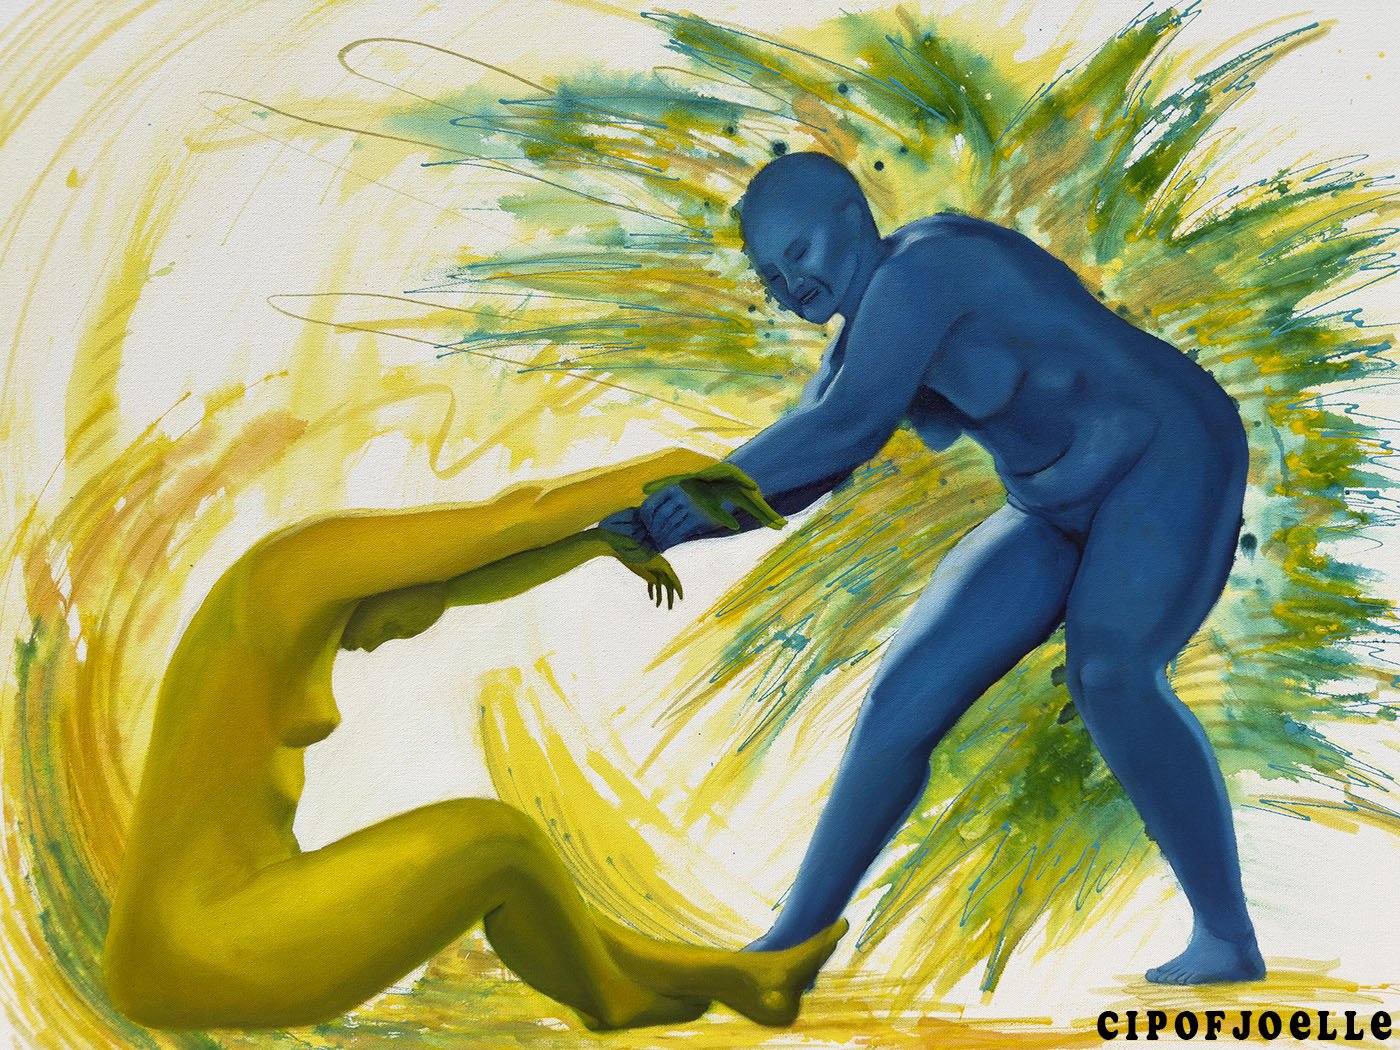
Step 5 — “Get up… I’m not ready”
This is the moment where you know it’s time to move, but you just can’t yet. The blue figure represents the higher self, clear, aware, and already in motion, reaching down and saying, “It’s time.” The yellow figure on the ground is the human self, still overwhelmed and still processing, asking for just a little more time before getting up, trying to build up the will power within the Solar Plexus.
It’s not a lack of discipline; it’s the space between knowing and doing. The body hasn’t caught up to the realization yet. The higher self doesn’t sit down or wait. It continues to reach and pull you forward, while the lower self resists, not out of defiance, but because it isn’t fully ready to move.
The yellow and green tones reflect this in-between state. Awareness is there, the heart is open, but action hasn’t landed yet. The swirling energy around them shows the internal tension, one part of you expanding while the other is still integrating. This piece is a reminder that growth doesn’t happen all at once. Sometimes you need a moment on the ground before you’re able to take the hand that’s already reaching for you.
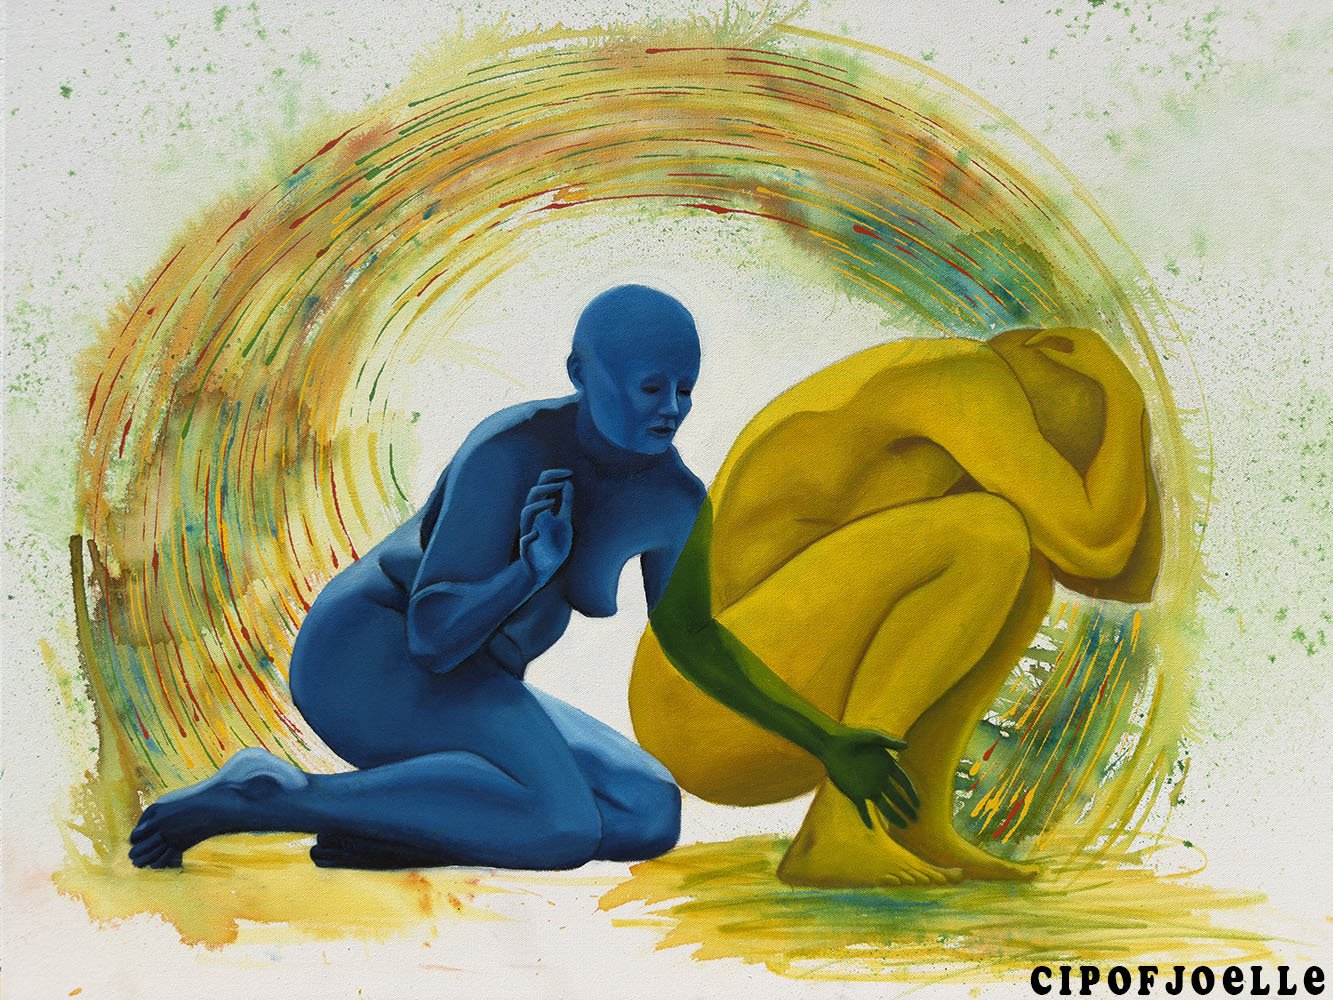
Step 6 — “You got this… no need to spiral”
This piece represents the moment after you feel like you messed up and your mind starts to spiral after returning to something you thought you were past. The yellow figure shows the human self, curled inward and caught in a loop of overthinking, guilt, and self-judgment. It’s that feeling of turning one moment into a full collapse, questioning everything and being hard on yourself for it.
The blue figure represents the higher self, calm and grounded, kneeling beside you instead of pulling you up. It isn’t rushing or forcing movement this time. It’s closer, softer, reminding you that you’re still okay, it happened for a reason. That one moment doesn’t undo everything. You don’t need to spiral to prove that you’ve learned.
You see clearly what happened, and your heart is trying to make sense of it without turning against yourself. The circular motion in the background represents the spiral itself, the mental loop that can either pull you down or be interrupted. This piece is about choosing not to fall deeper. It’s a reminder that growth isn’t about being perfect, it’s about how you respond to yourself after you slip. You already got the lesson, so there’s no need to spiral. Especially when it teaches you that you don’t have to go back to where you were before, you’ve grown even more.
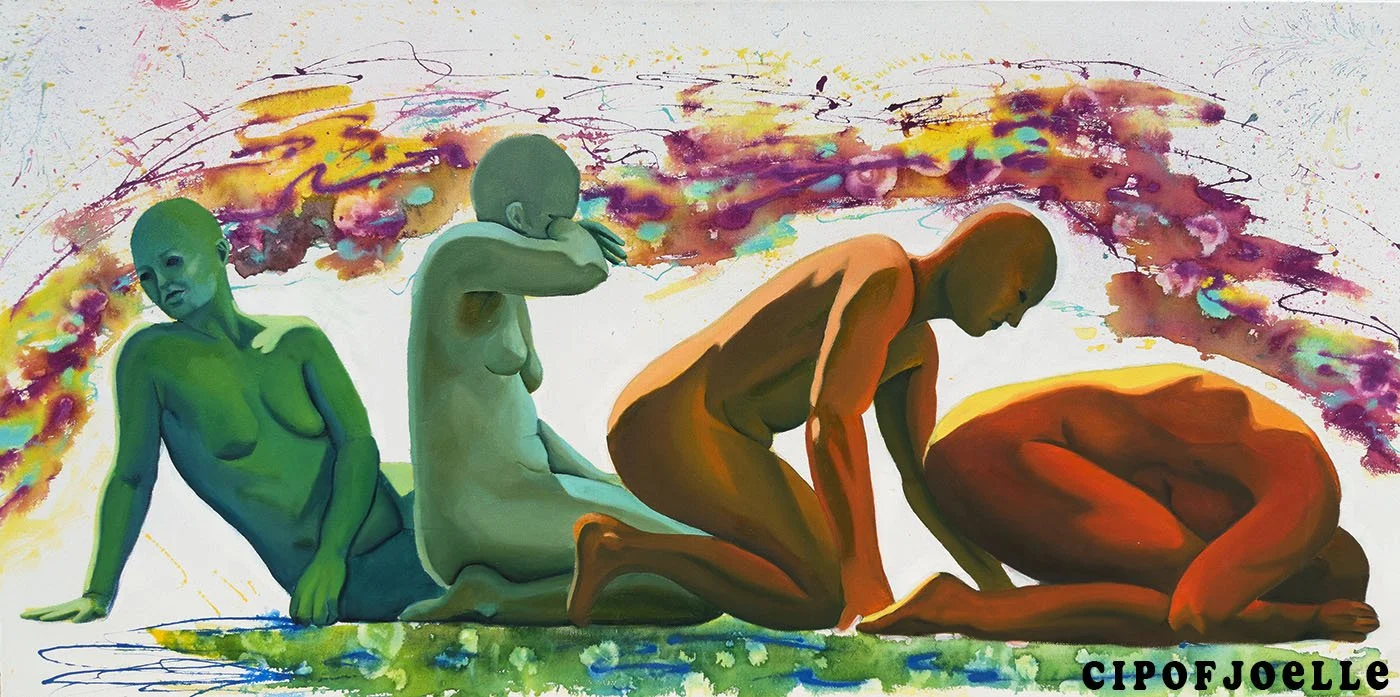
Step 7 — “Maybe I’ll try”
This piece represents the moment where you begin to move forward, even if you’re still unsure. The figure progresses through different energetic states, physically lifting itself from the lower chakras and moving upward into the heart space. Each version of the body reflects a different phase of healing, showing the transition from survival and emotional heaviness into a willingness to keep going.
While healing is never linear, the orange figure represents being back at the Sacral Chakra, the space of emotion and desire. It carries the weight of the past and the familiarity of old patterns, which is why the body still curls inward. The shift into teal marks the energy moving upward between the Heart and Throat Chakras. This is the moment where emotions begin transforming into understanding, where you start recognizing what you’ve been through instead of just drowning in it. As the figure reaches green, the Heart Chakra opens, symbolizing healing, compassion, and the decision to choose yourself even when it’s uncomfortable.
There’s still hesitation in this piece. As the figure rises, it looks back on the earlier stages of itself, not because it wants to stay there, but because pain can still feel familiar. The swirling colors behind the body hold traces of every stage it moved through, showing that healing doesn’t erase the past, it carries it forward in a different form. This piece is about the quiet decision to keep trying anyway. Not because everything suddenly feels better, but because somewhere deep down, you know there’s nothing left for you in the version of yourself that stayed on the ground.
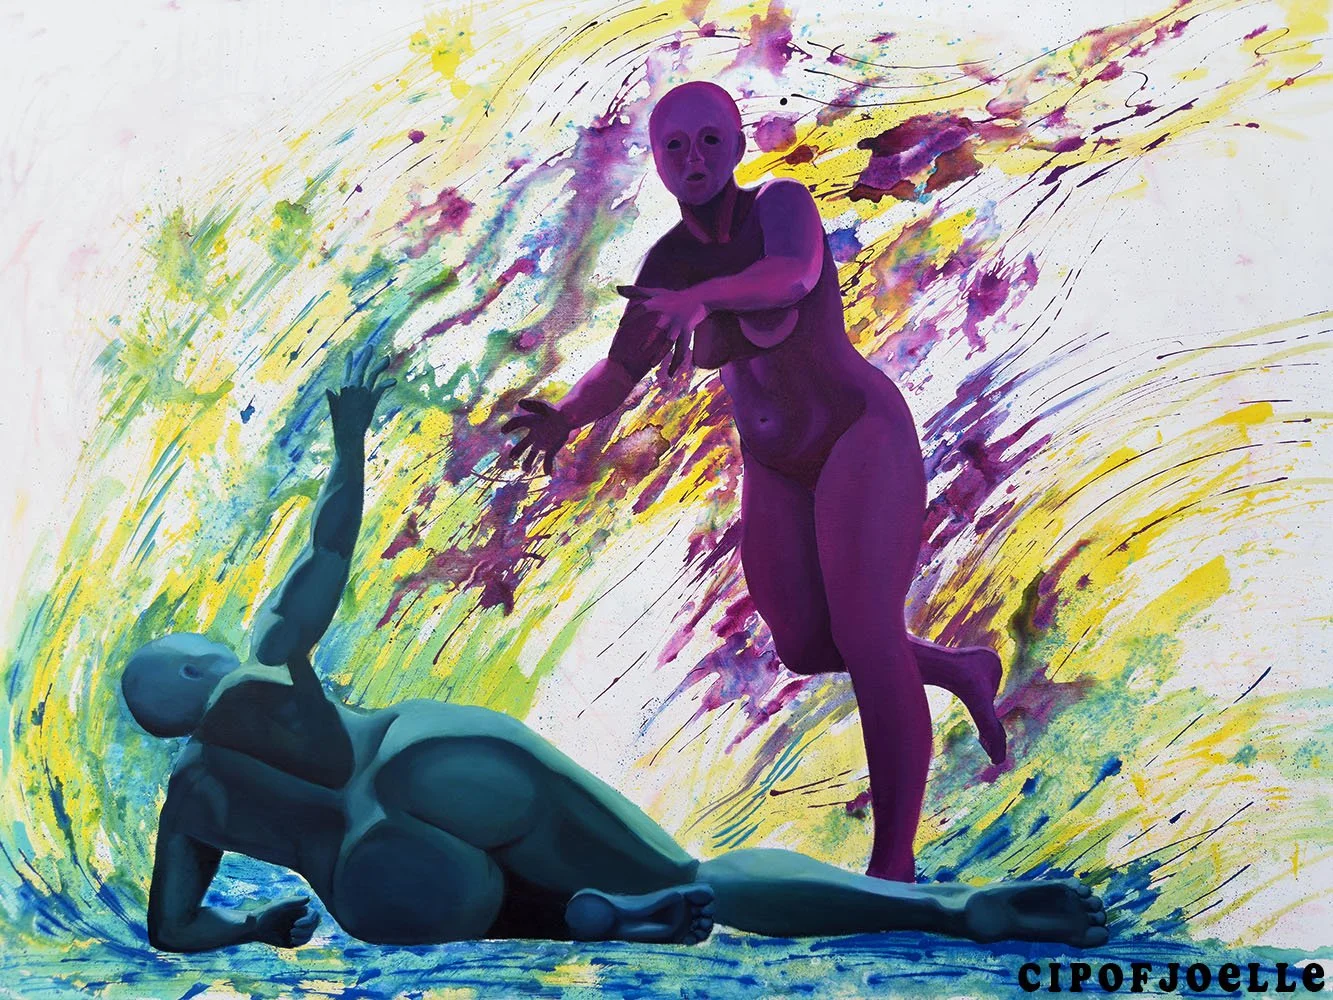
Step 8- “Let Me Help!”
This piece represents the moment where you finally choose to accept help instead of isolating yourself in what you’re feeling. After beginning to rise in Step 7, the figure now reaches outward, making the decision to connect rather than stay on the ground alone. The purple figure extends forward confidently, rushing in to help pull the lower self up, while the teal figure reaches back in return. It captures the moment where support is no longer being ignored, but actively received.
The teal tones reflect the blending of the Heart and Throat Chakras. Green carries the energy of healing and emotional openness, while blue represents communication, truth, and expression. Together, they symbolize the ability to finally speak about what you’re carrying instead of silently holding it inside. The purple figure carries the energy of the Crown Chakra, representing higher awareness, the connection to something greater than the self. Unlike earlier pieces where the higher self watches from a distance, or is holding compassion, this figure fully steps in, urgently responding the moment help is accepted.
The swirling colors in the background represent the emotional energy that begins to move once connection is allowed in. Where earlier pieces held tension between staying down or getting up, this piece marks the choice to no longer do it alone. The reaching hands mirror one another, showing that support was always nearby, but healing could only begin once the choice was made to receive it. The higher self moves quickly here, almost urgently, because once the decision to accept help is made, healing begins rushing in too.
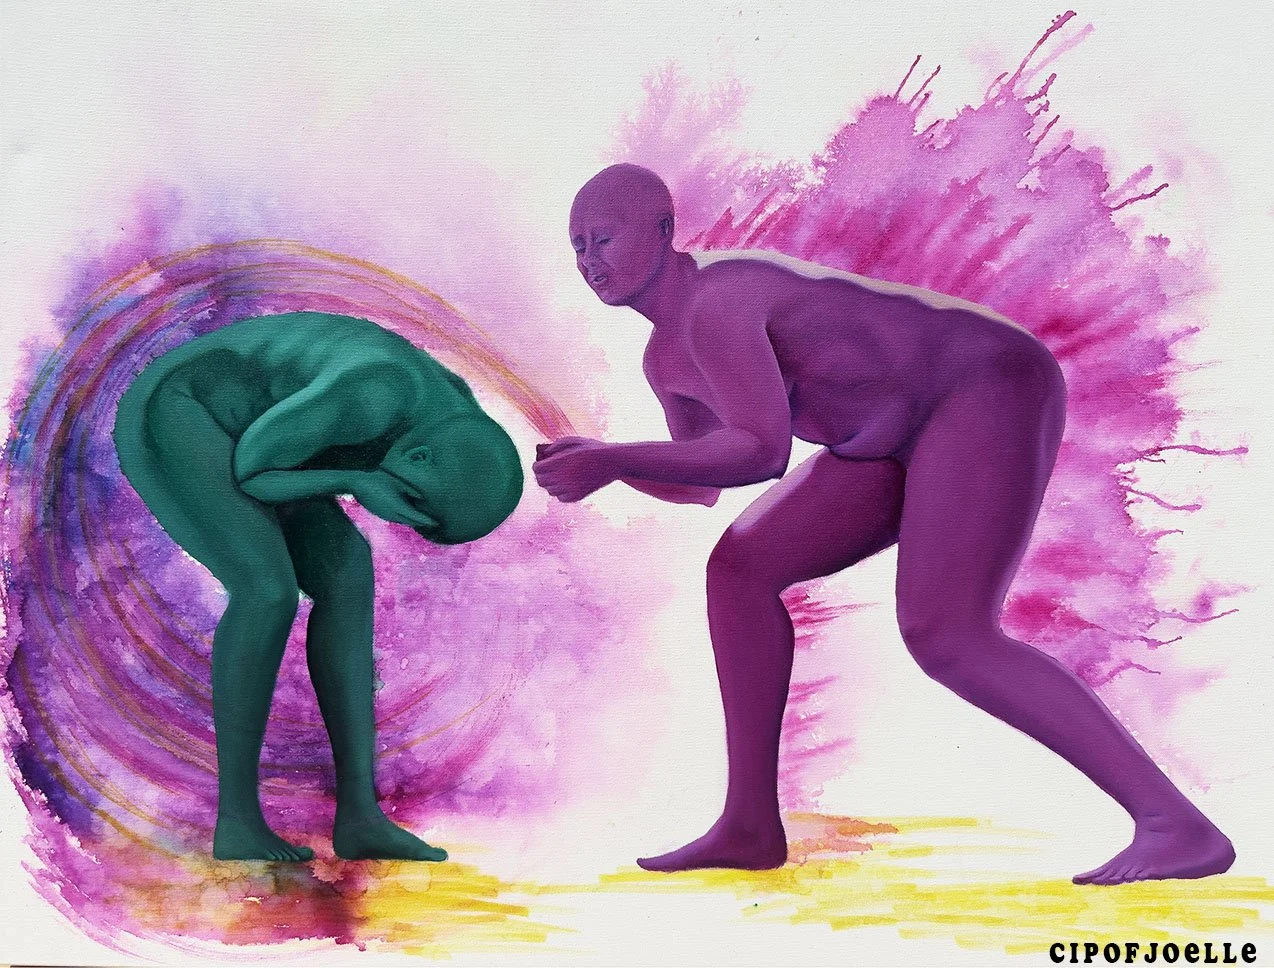
Step 9- “ Look At What You’re Going to Become”
This piece represents the moment where you continue moving forward even while you’re still hurting. After reaching out for help in Step 8, the lower figure has finally chosen to stand up instead of staying on the ground. The blue-green figure stands curled inward, almost cocooned within itself, carrying the weight of everything it has been through. There’s exhaustion in the body, but also movement. Even while broken, it’s still standing. The purple figure represents the higher self fully emerging, almost butterfly-like, reaching toward the lower self and reminding it to keep going. It’s saying, “Look at what you’re going to become. Don’t stop now.”
The blue-green tones reflect the Heart and Throat Chakras, showing a shift into healing, honesty, and emotional processing. The figure is no longer trapped in survival mode but is still learning how to move through pain without collapsing back into it. The curled posture shows that transformation can still feel vulnerable, even while growth is happening.
The purple figure carries the energy of the Crown Chakra, symbolizing higher awareness and spiritual growth. Unlike earlier paintings where the higher self pulls or pushes, this figure simply reminds. It already sees the transformation before the lower self fully believes in it. The swirling purple energy behind them represents awakening beginning to form around the pain, like wings growing around a cocoon. This piece is about trusting that even in your most unfinished state, you are already becoming someone new.
Step 10 — “Raise You Up”
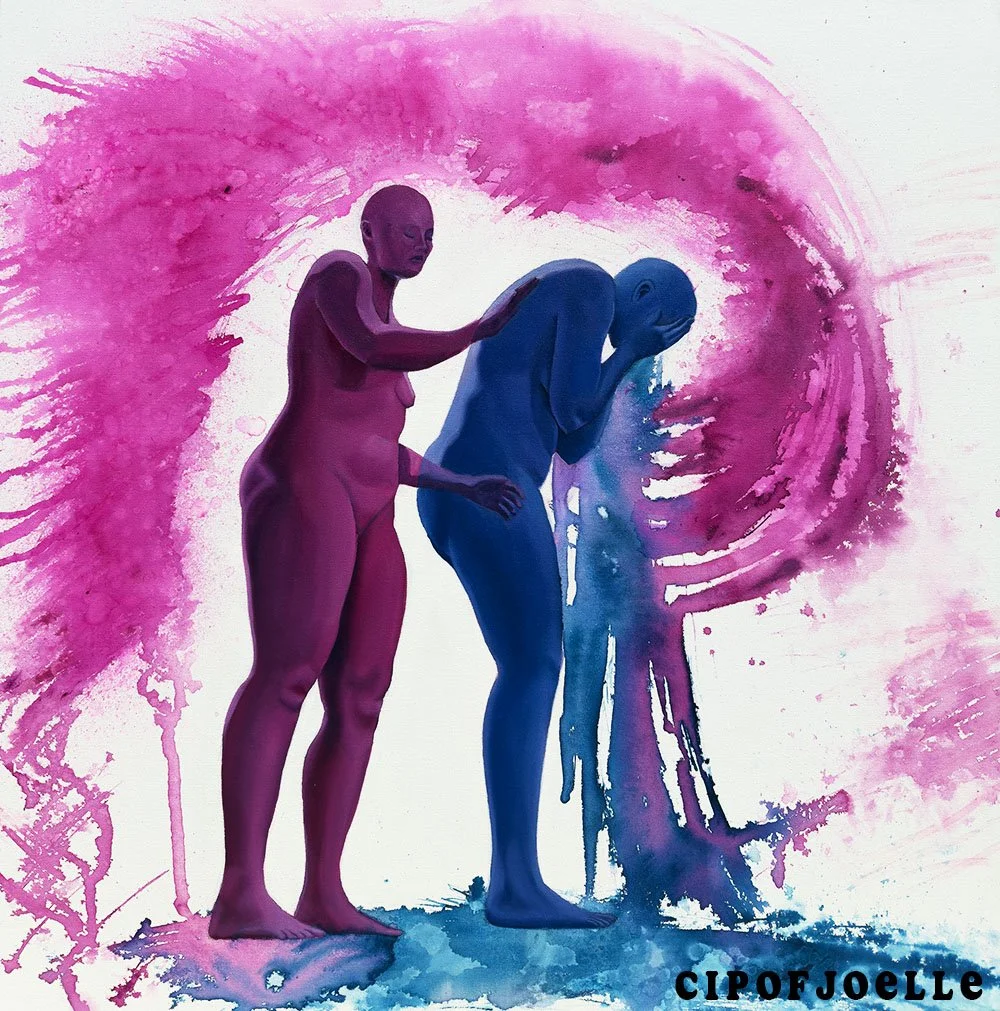
This piece represents the moment after you’ve chosen to stand, but before you’re fully steady on your own. The blue figure is still carrying the weight of shame and the memories of everything it has overcome. Its body remains heavy, yet it continues to stand. Rather than pushing the figure forward, the purple higher self gently holds it upright, offering support so it doesn’t fall back into old patterns. This is not a moment of action, but a moment of stabilization.
The blue figure carries the energy of the Throat Chakra, representing truth, self-expression, and the integration of lived experience. By this stage, the figure is no longer running from what happened or hiding from it. It is learning how to stand in its truth without letting that truth define it. The purple higher self carries the energy of the Crown Chakra, symbolizing higher awareness, wisdom, and spiritual connection. Instead of calling from afar or rushing in to help, the higher self now stands beside the lower self, providing strength while it finds its balance.
The flowing energy surrounding the figures reflects a period of integration. There is less urgency here than in the previous steps and more stillness. This piece captures the calm before the storm, the space where you are given time to process everything you’ve experienced and release what no longer needs to be carried. It is a reminder that healing is not always about taking the next step. Sometimes it is about allowing yourself to stand still long enough to realize that you are already stronger than you once were.
In step 9, the higher self is showing the vision, In Step 10, it’s almost saying “Good. Now stay here for a moment. Let yourself become it”
Step 11 — “You’re Almost There”
This piece represents the moment where you’re tempted to let guilt define your journey. The blue figure carries the weight of disappointment, shame, and the feeling of having fallen short. After coming so far, it can be easy to focus on a mistake rather than everything that has been overcome. The purple figure reaches toward the blue figure with reassurance, reminding it that one moment does not erase all of its progress.
The blue tones reflect the Throat Chakra, representing honesty, self-reflection, and the ability to face the truth of your actions without becoming trapped by them. The purple figure carries the energy of the Crown Chakra, symbolizing wisdom, perspective, and spiritual understanding. Together, they show the balance between accountability and self-compassion.
The flowing energy throughout the piece represents forward momentum. Even in moments of setback, growth continues moving. This piece is a reminder that healing is not measured by perfection. Sometimes the lesson arrives through the very thing you wish hadn’t happened. The higher self understands this and gently reminds the lower self to keep going. You are not back at the beginning. You are not lost. You’re almost there.
Step 12 — “Welcome Home”
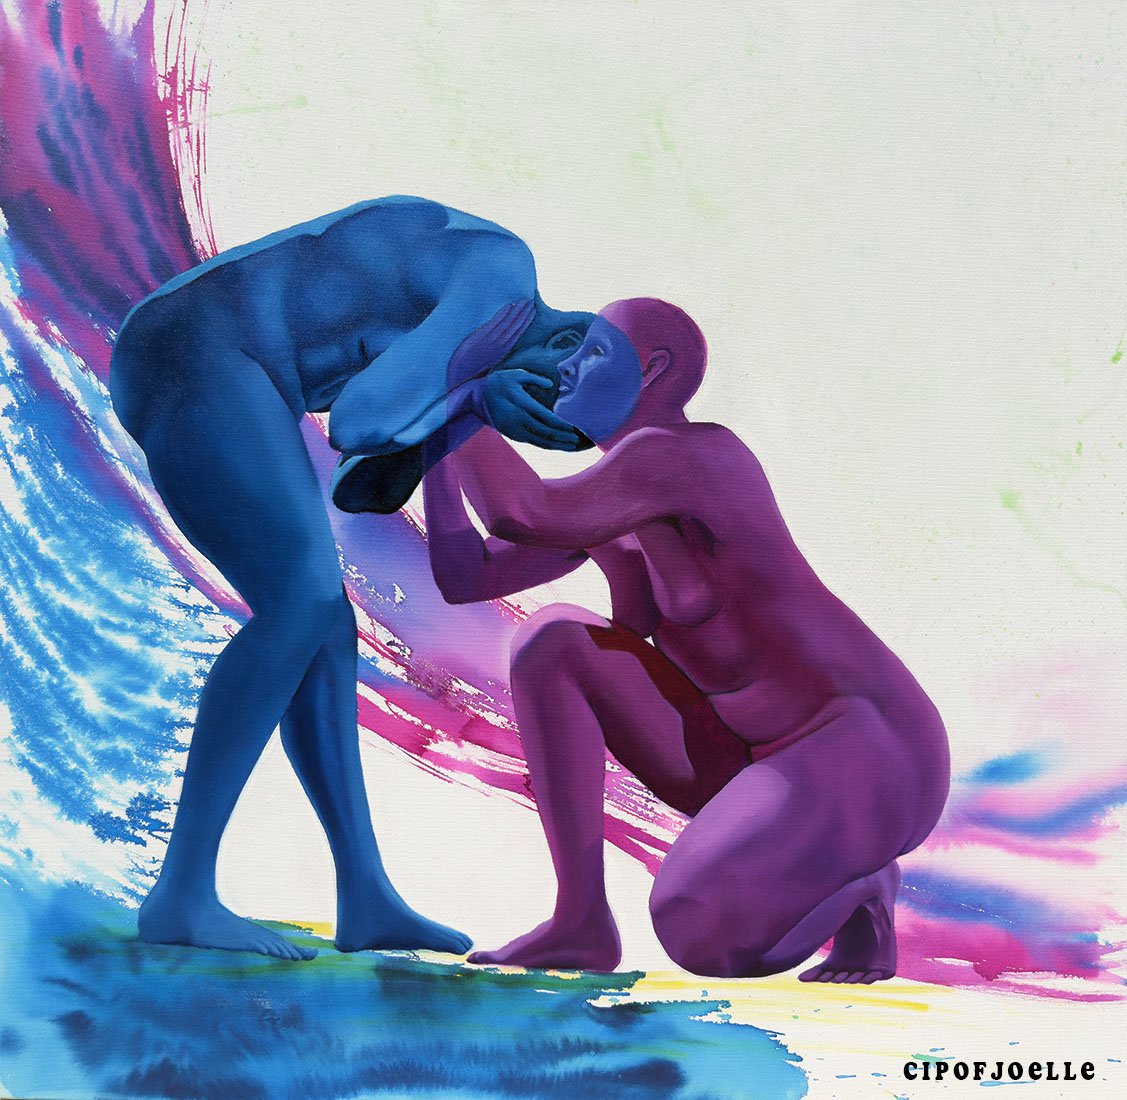
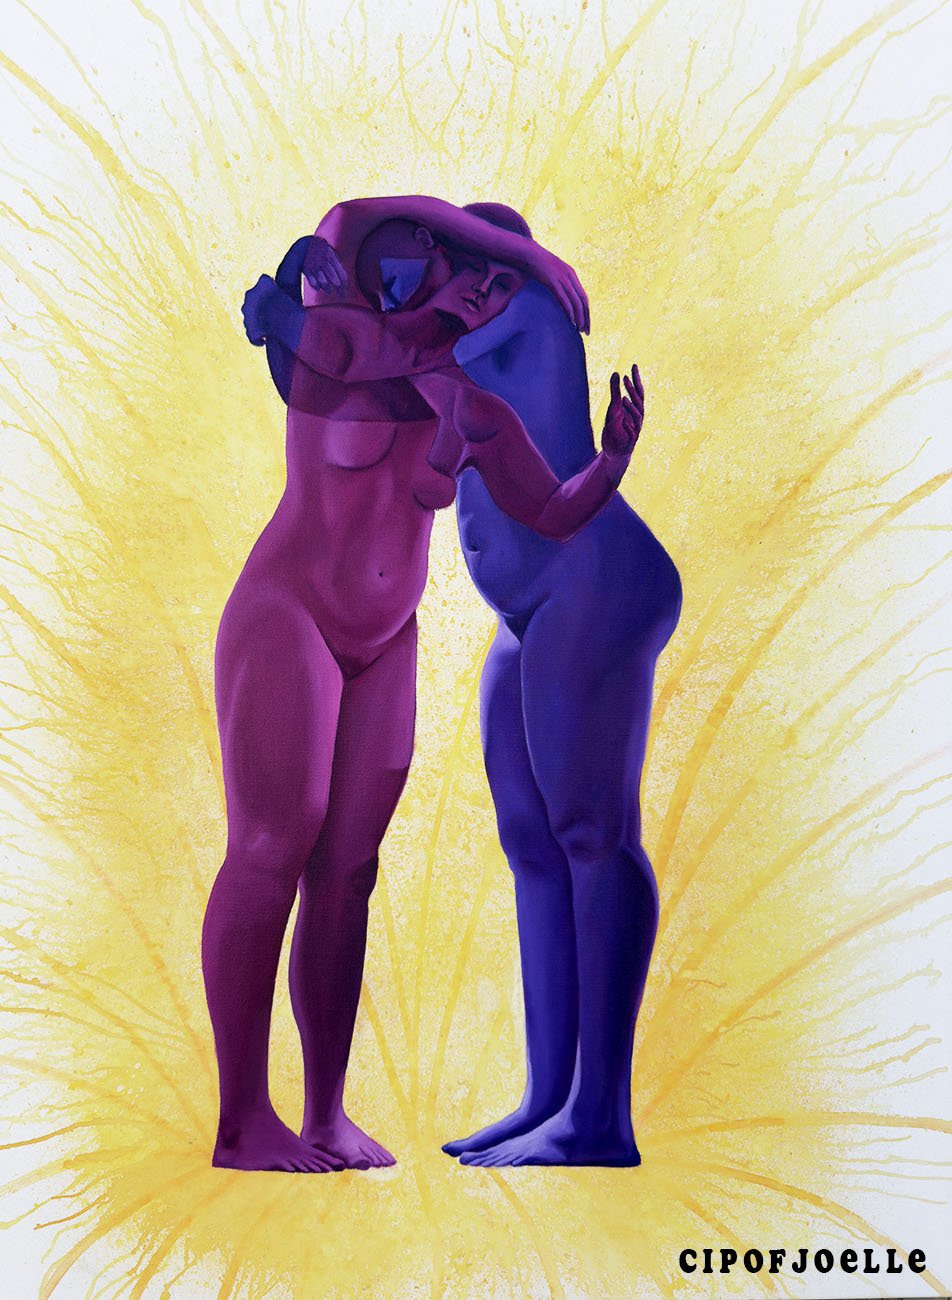
This piece represents the final step of the journey: coming home to yourself. The purple and pink figures embrace one another, no longer separated as the higher self and lower self, but reunited as one. The struggle between who you were and who you’re becoming has dissolved. What remains is acceptance.
The purple figure carries the energy of the Third Eye Chakra, representing wisdom, intuition, and the ability to see the deeper meaning behind every experience. The pink figure reflects the Crown Chakra, symbolizing spiritual connection, higher consciousness, and unconditional love. Together, these energies show a state of understanding where the lessons of the journey have finally been integrated.
This piece is about forgiveness. It is the realization that healing does not come from rejecting the versions of yourself that made mistakes, relapsed, or lost their way. It comes from embracing them. Every choice, every setback, and every painful lesson led to this moment. To heal is to love yourself wholly. To look at every past version of yourself and say, thank you for surviving long enough for me to arrive. Welcome home.
The journey doesn’t end here, it expands, outward, into community, creation, and compassion. This is where healing becomes service.
You’ve become the person you’ve been looking for.
You no longer need a drug to fulfill you, you’ve fulfilled yourself. You’ve arrived at the version of you that always waited beneath the chaos, and realized that sobriety isn’t deprivation, it’s your highest form of self.
“The choice remains with you.
The moment when you have had enough is when life begins anew.
It won’t be painless. It’ll hurt more than you know.
But slowly, through the days and nights, you’ll become the one you hoped.
And then one moment, you’ll feel it in your chest —
you’ve finally won the war against the battle in your head.
Because you chose not to give up, not to give rest.
You chose to be the change, with every single breath.”
— from “Changes (Extended Message)” by Open Boundaries